Teacher on the Trail, Jim Deprez, featured Jeff Schultz in a recent Voices of the Volunteers post. Schultz has brought the race to fans around the world with his photos since 1981. He knows every nook and cranny of the trail and uses both art and science in his trade. His photos are lively, they are captivating and each one tells a story.
When Jeff was in 7th grade, a friend brought a 35 mm camera to school. Did he know this was going to be his life’s work when he first looked through the view finder? As he held the camera, he was intrigued and inspired. He read books about photography, studied the camera and practiced. His career was born. Incidentally, it was 49 years ago that Jeff first held that camera. His love for photography and the Iditarod were born at nearly the same time!
As the teacher on the trail in 2006, I flew the trail with Jeff. I had plenty of time to observe him working and ask questions. As the Eye on the Trail journalist, I found myself standing next to Jeff many times capturing the same scenes, I asked more questions. Participating in his photo adventure tours, I’ve learned much about the science and the art of photography. I studied Jeff’s work to get a feeling for the art and dynamic nature of his photos. It’s part of the art I’d like to share with you – composition. More specifically, using the Rule of Thirds.
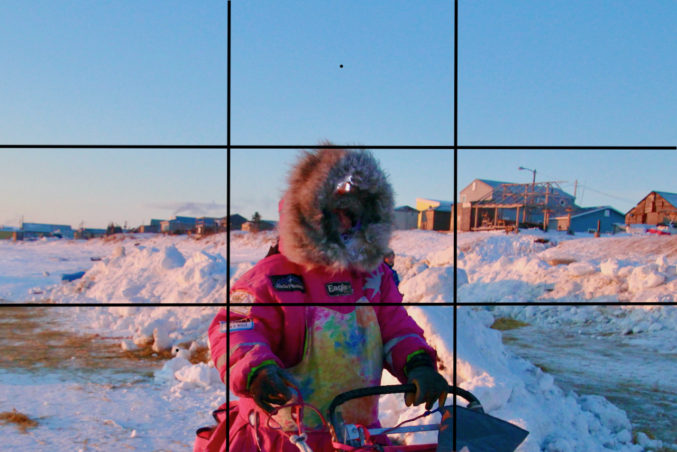
The Rule of Thirds gives the person behind the camera some guidance in where to place the subject, focal points or the horizon in the photo. While framing a shot in the view finder, divide the frame into thirds up and down as well as side to side. You’ll have nine squares. The Rule of Thirds helps the shooter make the photo more interesting by placing the subject outside of that “center” box. Yes, your photo isn’t “centered” but by not being centered it’s usually far more interesting and more engaging.
- Subject and Horizon are Centered.
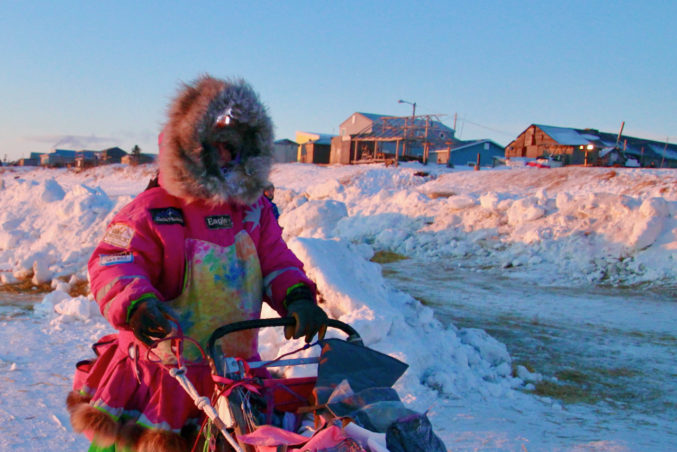
- Using the Rule of Thirds for Subject and Horizon
This shot of DeeDee Jonrowe which I took in 2017 as she was leaving Unalakleet demonstrates the Rule of Thirds. It’s the same photo just aligned differently through cropping. In the one with gridlines, she’s centered as is the horizon. All in all, a not very interesting photo. In the other, her face, a focal point, is located at the upper left intersection of the lines and the horizon runs along the upper line. With DeeDee’s body at the left line, the dead space behind her is eliminated and she has room to move forward which implies action. This photo is far more interesting.
Jeff Schultz would encourage us to apply the Rule of Thirds while shooting. That’s very good advice. But DeeDee was in motion and wasn’t going to stop so that I could get this just right using the Rule of Thirds so in my original shot, she was pretty much centered. But thankfully we have editing options. So I applied the Rule of Thirds using the CROP tool while sitting in the comfort of the checkpoint rather than outside in the subzero temperatures with a moving subject.
Today, even young kids carry cell phones. The fantastic phone cameras apply the science and let the shooter compose the picture. As I did with DeeDee’s photo, the Rule of Thirds can be applied to a hurriedly taken or so-so photo by using the CROP tool found right in the phone’s photo app. Some phones have the option of having the gridlines visible in the viewfinder.
How can The Rule of Thirds be used in the classroom? Art teachers, have at it when explaining composition and what makes a picture or drawing more dynamic and interesting – send kids out to practice with their cell phone camera. Classroom teachers, are your kids working on a photo board for a project or taking pictures for a power point presentation? Introduce the Rule of Thirds to help your students create photos to use in their assignments that are engaging, appealing and do justice to their presentation.


