 There’s nothing better than hands-on real-life experiences for learning. Thanks to musher and educator Tim Vandermeuelen, Symposium participants went to work making necklines and constructing a doghouse. Tim handed out pre-cut and marked lengths of braided nylon and the indispensible fid to everyone interested then the fun began – push the fid through the rope at the mark, thread the rope into the fid, make a loop by pulling the fid and nylon rope through the rope, insert the fid through the length… Plenty of experienced mushers who’ve made countless necklines were on hand to make a nearly 1:1 teacher student ratio. Wisconsinite and 2013 Iditarod Teacher on the Trail, Linda Fenton, tried her hand at creating a neckline. Fenton was on hand as a presenter for the teacher portion of the conference sharing ideas with educators on how to get your whole school involved when using Iditarod as a theme for education.
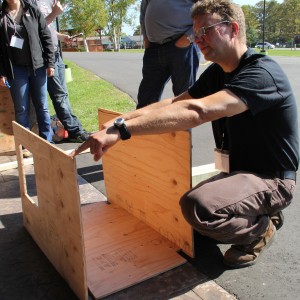
 Get out the hammer and nails, well actually the drill/driver and screws for a demonstration led by Tim Vandermeuelen. on constructing a sturdy house any sled dog would be proud to call home. Efficiency and economy is the name of the game for mushers with even a small kennel. There are numerous “one sheet” plans available that offer a flat roof, which sled dogs love for getting up in the world and sunbathing. Add to the one sheet of ½ inch plywood a couple of 8’ sticks of 2X2, a couple of 8’ 2X4’s and lots of screws to create a house that’s warm, dry and the right size. Not counting the visit to the lumberyard and the time for the paint to dry, the time investment can be as little as two to three hours.
Symposium participants went away with a basic plan for the “one sheet” house and a visual on how to put it together. Vandermeuelen, a technical school instructor, says building a doghouse can be a great class project using plenty of math skills in the whole design and construction process. Careful supervision and safety instruction is required when using power tools – pre-cutting is always an option. Students might even be challenged with the idea of designing and building a “perfect doghouse.”
The pieces are pre-cut and ready to assemble.
Start by attaching the 29” legs to the side panels. Elevating the house allows for better circulation around the house to keep it warmer in the winter and cooler and dryer in the summer.
Tim Vandermeuelen preparing 2X2 braces for the notched floor.
Adding the Arctic entry around the 10X11 door opening. Door size is dictated by the size and condition of the dog. A door that’s too large allows valuable body heat to escape in winter. The door should be large enough to allow the dog easy entry and exit to avoid back strain. The door can be surrounded with 2X3, 2X4 or 2X6 material.
Framing the removable roof.
Just add paint (preferably indoor latex paint), straw and a dog.
The internet is a great resource for plans, ideas and suggestions for building the best house for your dog, sled dog or not.
Born to Run,
Sanka


